Category Archives: Tutorials

Silver Scroll Work Earrings – A Jewelry Making Tutorial

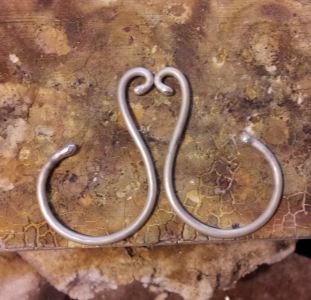
My latest obsession is scroll work, like the earrings above. I love swirls and coils, and flowing shapes, and I especially love the challenge of making mirror image pieces. In this tutorial, I’m going to show you a little bit of my process. Specifically, I want to show you how to make scroll shapes using nothing but pliers and your hands, and also how to get nearly perfectly matched pairs of the same shape and size. You know those jigs? The kind with the pegs that you wrap wire around to get certain shapes and sizes? If you have one, put it away. Don’t touch it. You’re going to do this on your own, and here’s where you’ll start: with some sketches.

Ok, no judging my drawing skills, or lack thereof. I don’t usually get too detailed with my drawings, I just use them to try out shapes I’m thinking of, or to get ideas. Also, if you look at the lined paper closely, you might recognize a few of the sketches as earrings that came into being. See the one drawn in blue pen on the overlapping page? That’s what I’m making today.

Once you’ve decided on a design, cut a piece of wire about 1.5 times longer than the desired length of the finished style. A little longer if the finished style will be wide. I don’t really measure. You know the saying ‘measure twice, cut once?’ I like to throw caution to the wind and just eyeball it. Once you have your first piece cut, use it as a guide to cut the second piece. I like to ball the ends of my wires. If you’re going to do this, ball the wire before you cut it. If you cut the lengths and then ball them, you might end up with slightly different lengths. If you’re not going to ball up the ends, just cut them and finish the ends so they’re not sharp. I used 14 gauge sterling silver for my primary shapes.

After your primary pieces are cut and the ends are finished, I recommend annealing and pickling them before you start. If you anneal them, you’ll have a much easier time getting a smooth, even shape that you make by hand.

Now we can start shaping the first wire with pliers or bail makers. Try to remember what size on the bail making pliers you used for what part of the scroll. If you’re using tapered round-nose pliers, make a mark with a sharpie on the pliers where you bent the wire. Notice in the photo below that the wire is not bent tightly around the pliers. This shape is almost completely formed by hand. I use the different sizes on the pliers to prevent the ends from being bigger or smaller than I want. Once the wire is grasped in the pliers, I use my other hand to gently pull the wire into a round, flowing shape. Watch for flat spots and angles, and straighten them out with your hands and pliers as soon as you see them. If the piece becomes work hardened, and you can’t shape it by hand, anneal and pickle it again before continuing. Keep going until you like the shape. 

Using the same size on the pliers, start bending the second wire into the same basic shape. Make sure you mark your original shape so that you know which piece you’re working on bending. The piece on the left of the photo is my original piece. I don’t know if you can tell in the photo, but I burnished the top so I could easily tell it was the original. The piece on right is the second shape. I really didn’t do any shaping other than the initial shaping with the pliers. Now that it’s in roughly the same shape as the first, I’m going to show you how to make them the same!

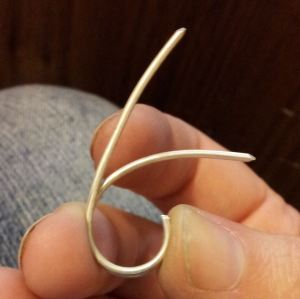
Keeping your original shape on top, hold them up against each other and match them up by the finished ends to check for consistency. See how I have the ends held together between my fingers? It really doesn’t matter which end you choose to start with, just make sure you always use the same end. Meaning, don’t match them up by the other end when you check them the next time. Obviously, there are several spots that need to be adjusted on the piece in back, but now I know exactly where to start. Make little adjustments, and keep checking on your progress by matching them up again.

That looks about right! This is both pieces held together. You almost can’t tell they’re both there. That must mean they’re perfect! No… not quite. We’re going to look at them a couple more ways before we deem them good enough to move on.

Lay them side by side in several different orientations to check for differences. I can see a couple of spots that still need some adjusting in the first photo. Can you? The long part of the shape on the left piece isn’t quite as graceful as the one on the right. In the second photo, I can tell that the right-hand piece needs a little adjusting on the top loop. Make the adjustments that you see, and go through both methods of checking before you move on. Once you’re satisfied, you might want to give them a couple of taps with a hammer to make sure everything is level. I used the flat side of a ball-peen hammer because I wanted to flatten out the balled up ends of the wire a little as well. You can flatten out the pieces as much or as little as you want. I do recommend at least hitting them with a rawhide or rubber mallet just to make sure they’re level. If they’re not, your secondary and detail pieces won’t sit evenly. Once you’ve hit them with the hammer, guess what you have to do? That’s right! Go through the checking methods again to make sure they didn’t get distorted while hammering.

Now we’re going to make the secondary pieces. I used 16 gauge sterling silver wire for this piece. Cut two identical lengths of wire and shape them using the methods above. Place them on the main piece in several places and orientations to decide what you like best. I want them to lay about like they are in the below photo, but this piece still needs some adjustments.

Continue shaping until you get the best fit, and then shape the other piece to match. Don’t worry about making the ends fit just right. You’ll cut off the excess and file it once it’s soldered on.

Remember to hold them against each other to check that the size and shape are the same. Try each secondary piece in each primary piece. You may find that one secondary piece fits better in one primary piece than it does in the other one.

Once you know which secondary piece fits best in which primary piece and they look the same, you can solder them in. I like to use paste solder, but you can use any type of solder you prefer. Some people don’t like to use paste solder, and I can understand why. Unless you pick up the piece and scrape the solder on, it really doesn’t stick to the metal. Once you have your pieces laid out the way you want them, you really don’t want to pick them up and mess that up. Here’s a little trick that might help. Warm your solder board with your torch, then place the piece on the warm spot. The heat will gently transfer to the silver and make it warm. When you touch the solder to the metal, the solder will melt a little, stick to the metal, and get down into the crevices. Don’t heat the piece directly because if it’s heated too much, the flux will burn out of the solder and the solder won’t flow. You can see in the photo that the solder is kind of shiny and creamy, rather than firm and dull. Much easier!

Always solder both sets at the same time. Lay them out side by side, in opposite directions. This helps you to maintain a visual balance so you know you’re soldering each piece symmetrically with the other. Also, make sure that the side you solder them on right now is the side you solder them on every time you add a piece. This will keep everything flush on one side, even if you use thinner gauges of wire, and it will make sure you only have one side to clean up.

Once they are soldered, you can use your flush cutters to cut off any excess from the ends. Cutting at an angle will help you smooth it out. Be careful not to cut into the primary piece, and don’t cut too far down into the solder join.

If you can fit a file into the area, taper down the cut with a file. If the space around it is too small for a file, use a sanding bit on the flexshaft. Don’t file into the primary shape, or you’ll get an ugly little divot. You can smooth out the file marks with a fiber wheel.

Ok, now we’re going to add the details. Obviously, you’re going to use the same steps that you have thus far, with one change. Many times in my designs, the detail pieces require fitting the end into a crevice created by other pieces joining. Here’s how I do that, after I’ve made the shape for the space I want. If the wire is too long for the crevice, place it where you want it, and gently pick it up with your flush cutters, right where you want to cut it. Don’t cut it while it’s laying on your piece because you might cut or mar the finished piece. Once you have the length you like, file the ends down to a point on both sides to give a tighter fit.

Continue with all of the steps until you feel like it’s done. You can add bezel cups for stones and earring backs, but make sure you do that last. Here are my finished earrings! Now let’s see yours 🙂


Faux Shibuichi Tutorial Update

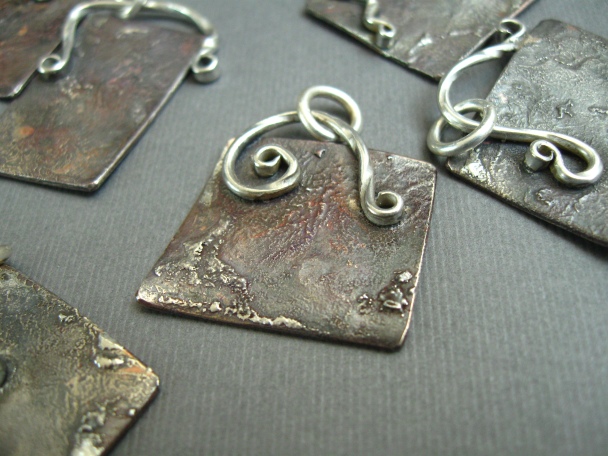
I haven’t gotten sick of this technique yet! That’s quite the record, for me. I knew the next step was to figure out how to use this technique in a ring, so that’s exactly what I did. Four, to be exact. Well, ok, five. But one of them is crunched in half because I got mad and ruined it. My husband and I celebrated our 10th anniversary last month. For the last two years, I’ve been thinking I wanted to make us new rings for this milestone, but I couldn’t figure out what to make, so it passed me by. After messing with the faux shibuichi finish, I knew exactly what I wanted to make. The set of rings above are our new wedding bands (we’re a little non-traditional, hehe). This post is not so much a tutorial on how to make a ring, but to tell you what else I learned about this technique. If you haven’t read the tutorial yet, check it out here.

I love copper: the color, the patina possibilities, the workability, the strength. The only thing I don’t like is that it turns your skin green! I know some people don’t mind that, and wear copper rings all the time. Not me! I like the color green and all, but I don’t like my finger to look moldy. I decided to see if the faux shibuichi finish would prevent this ickieness, or at least delay it. To do this, I did the fine silver fusing on one side, quenched in water, scrubbed the back of the band, and fused the fine silver there too. Doing this on both sides did not seem to have any kind of an impact on the other side!

Now, here’s where I got angry: soldering. First, I kicked myself because I grabbed the hard solder right off the bat. What did I tell you in the tutorial? No hard solder! Medium or easy only. So that turned into anti-solderable oxidation city. Then I broke another cardinal rule. Yeah, I pickled it. Then I had to scrub it to death with steel wool, then polish the tar out of it with the flex shaft. I tired it again, this time with easy. Same thing. Part of it would adhere, part of it wouldn’t. I must have tried soldering it in various ways four or five times. That’s when I crushed that ugly in my hands (told you I was mad), and tossed it in the ‘whatever pile.’ I started over. This time I had a really good idea, that turned out to be a junk idea. Instead of using solder, I smeared a little more metal clay paste over the seam and heated it until it flowed. Nope. You’ll never guess what I did then…

Wanna try to guess?

I freakin’ pickled it again! This time it stayed in overnight. I figured, what the heck? It’s probably going to end up with its brother in the ‘whatever pile.’ And then, it happened…

While I was sleeping, I thought about how frustrated I was. Why wouldn’t those rings solder together!? I scrubbed them, I cleaned them, I used easy solder, I had no problem soldering the coils on the charms. Why now? Ah HA! The coils were sterling silver. Maybe the shibuichi finish doesn’t like to be soldered to itself! So first thing this morning, I pulled the blue/green crusted ring band out of the pickle pot, gave it a quick polish with the bristle disk, and cut a little strip of 18 gauge sterling sheet. I can’t remember if I used medium or easy solder, but it doesn’t matter. It soldered beautifully! I like the contrast too. Now, I’m no metallurgist, so I’m not sure why the silver solders so easily to the finish. I wonder if there’s just so much oxidation going on that two pieces of the finish can’t adhere to each other. That’s funny though, because I don’t pay much attention to getting the metal very clean when I solder the sterling on (I like to live life on the edge), and I have zero problems. It’s a perplexing quandary served with a side of whatever.

Now that I (finally) got the rings soldered, I gave each one a quick, asymmetrical flare, a slight cleanup with the bristle disk, and threw them in the tumbler. Notice the difference in color in the photo below? The larger one on the left is the one that got pickled… several times. The smaller one on the right was never so unfortunate. I’m not a huge fan of the pinkishness of it, and while I could polish that out, I think I’ll leave it for awhile and see how it wears. It might get more pink, it might turn brown or grey. Who knows? I’ll let you know when I do.

Now the real test: Does it turn my finger green? It looks like it might be trying to, but I’ve only been wearing it for a couple of hours. **Update: Yep, it’s turning my finger green. However, I choose to see it as still wearing my ring, even when it’s off 🙂

I know the above photo is a little blurry on the face of the rings, but the inside is clear. You can see that they look the same on the inside as on the outside. I like that.

One final note. I didn’t think that the rough finish would be very conducive to stamping. I like to stamp the inside of all my rings, and I was worried that wouldn’t be possible. I used 2mm letters (that’s pretty small!) on the inside, and they’re just as legible as they are on a flat surface! You can just barely make it out in the pinkish ring in the first picture.

Has anyone tried the technique yet? I’d love to see if you do!!

Happy No Pickling!

~Jane


How to Make a Faux Shibuichi Finish on Copper: A Jewelry Making Tutorial

Image

Sometimes I find that a lack of inspiration while making jewelry can lead to really interesting innovations. In this tutorial, I’m going to show you a technique I came up with during one of these times. I call it “faux shibuichi.” Shibuichi is an ancient Japanese alloy of silver and copper which creates really interesting oxidation possibilities. I particularly like the look of shibuichi when it has been reticulated. You can read a little about this alloy here.

This tutorial assumes that you already know the basics and have the basic tools. If I breeze over something and you have a question about it, please let me know. I’ll be happy to clarify anything for you (can you tell I worked in call centers for many years? “I’ll be happy to help you with that today!”).

Here’s what you’ll need:
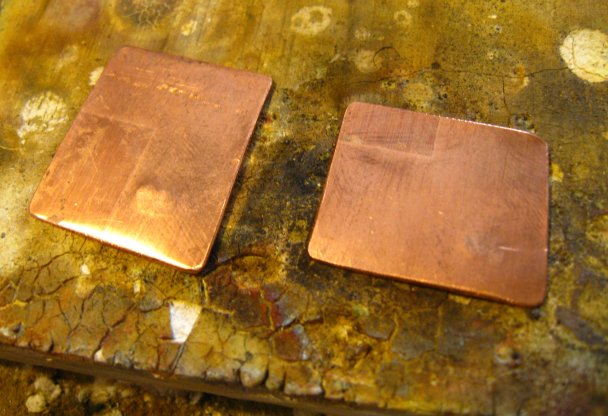
– 20 gauge copper sheet cut into about 1×1 inch squares.
– Fine silver metal clay paste.
– Medium or easy paste solder.
– 16 gauge silver wire to solder on.

The first thing you need to do is prepare your fine silver metal clay slip. It really doesn’t matter how thick or thin it is. Experiment with it and see what you prefer. My slip was pretty thick, about the consistency of thick yogurt. The important thing is to make sure it’s very smooth! You don’t want any chunks in the slip because they won’t adhere to the copper and will flake off when you’re done.

Image

I didn’t prepare the copper in any way, except to round off the sharp corners with a file. Yeah, I know. I need a new soldering board. This one is about at the end of its useful life.

Image

Spread a layer of metal clay paste over the surface of the copper with a pallet knife. Some spots I left pretty thick, and others I left thin enough that some of the copper showed through.

Image

Next, break out the torch! I fired these pieces while the silver paste was still wet. If you heat it slowly, the paste will have the opportunity to dry and you’ll experience very little cracking. Like this:

Image

If you heat it faster, the paste will crack and peel up onto itself, like this:

Image

Either way is fine! Try out different methods to see which you like best. If the paste peels up, you’ll have more of the copper exposed. If it doesn’t, you’ll have more silver on the surface. It just depends on the look you’re going for. I prefer a little to a lot of cracking, so I heated them pretty fast.

Continue heating until the paste is dry and the binder has burned off. Once the copper is glowing, get aggressive with the heat! Heat it until the silver melts and flows. As you drag the flame over the surface, the melted silver will follow and you’ll get some really awesome reticulation. You want to make sure that everything has had the chance to flow. See where it’s still white? If you leave it like that, the silver will flake off because the layer of oxidation between the silver and copper prevents fusing.

Image

Here are both pieces, all fused up! Aren’t they pretty? Well, maybe not just yet.

Image

Now here’s where things start to get a little weird. Under normal circumstances, you would want to pickle your pieces to remove oxidation and prepare the surface for soldering. While you can certainly do this, let me caution you against it. DON’T DO IT! That was probably closer to bullying than cautioning, but you get where I’m coming from. Here’s why I’m so against it:

First, by pickling you’re basically depletion gilding the silver and leaving a layer of fine silver on top. That means you’re removing the copper oxides (well duh! That’s what pickling is for, right?). But we want the oxides because that’s what shibuichi is all about!

Second — and I don’t know if it’s just the pickle I’m using or if this would happen with any kind of pickle — the pickle turns blue almost immediately. Also, a crusty, green/blue layer is added to the surface of the silver. If you’re interested, I’m using PickleIt, which you can get at metalclaysupply.com. It’s supposed to be “a safe alternative” to regular pickle. Normally, it works just fine on copper and silver, and I really like it. I only have to change it every couple of weeks, but while I was working on these charms, I had to change it twice — and that was after only 10 charms!

Third, it’s just way too much work. The green/blue scum does come off with some polishing and a little elbow grease, but then the silver is exposed and the oxides are gone. Now you have to flow the silver again just to get those back. You might as well just save yourself the hassle and not pickle.

Here’s a photo of the first piece after fusing. All I did was polish it with a bristle disk on my flex shaft.

Image

Here’s a photo of the second piece after pickling. This must have been right after I changed the pickle, because the green/blue scum isn’t too bad. Some of my first pieces were completely covered! Also notice that you can’t see any silver. What’s not covered by scum is copper colored. I’m not sure why it didn’t remove the copper from the silver. If you know why this is, I’d love to hear!

Image

And here’s what it looked like after polishing. Big difference when compared to the one that wasn’t pickled, right? It’s very silvery, whereas the other one was almost a gunmetal color.

Image

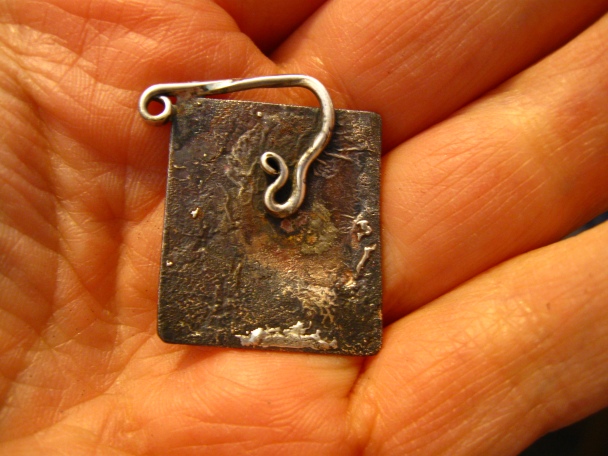
Next, I’m going to solder on the silver coils. Even though the first piece was slightly grey (which is a characteristic of shibuichi), I had no problems soldering, except when I tried to use hard solder. Because hard solder has a higher melting point, the surface flowed on the first few pieces I made. This creates more oxides and I found myself having to re-solder. What a pain! Once I moved down to medium solder, I had no problems.

Before you jump into soldering, let me tell you about a couple of other things you need to know. Sometimes, there are pockets of air (or pickle, if you threw caution to the wind) between the silver and copper. If you heat the piece without eliminating all of the tiny air pockets, the pockets can explode. Literally. This happened to me once when I was working on a piece and missed an air pocket. It snapped, and a tiny piece shot across the room. I was terrified I was going to take one in the eye! Fortunately, these pockets are pretty easy to detect. Just inspect the surface for anything that looks like a blister. If you find one, poke it with the tip of your fingernail (or, if you’re a nail-biter like me, use the tip of a needle tool). If it leaves a dent, you found one. If it doesn’t, you’re probably good. If you DO find one, heat the piece slowly until it flows again. Make sure to melt that spot down all the way.

Next, if you see any spots that are still very silvery before you polish, they’re probably going to flake off. If that’s the case, re-melt it! Once you’ve taken care of these things, you can polish and solder.

Here’s the first piece immediately after soldering.

Image

On the second piece (the one that was unfortunate enough to be pickled), I allowed the surface to flow a bit while soldering to regain the oxidized surface. However, I still had to take care not to polish it too much. Even though it flowed again, the oxides on the surface were not quite as strong. Here are both pieces all polished up!

Here’s what I was telling you about. I should have flowed all of those bright silver spots out, but I didn’t because I wanted to show you what to look for. See that spot in the red circle?

Just a quick scrape with my fingernail, and this is what happened.

Other than that, I’m pretty happy with them! What do you think? If you try out this technique, I would love to see photos of what you came up with. You can post them to my Facebook fan page here. If you have any questions about this technique, feel free to post your questions below, or on my Facebook page.

Happy faux shibuichi-ing!

~Jane